Back around re:Invent some very observent people picked up on a slide about an AWS Client VPN being available. Which was interesting because no one had seen a blog or any release information about it.
Not long (about 2 weeks) after re:Invent the AWS Client VPN made an appearance.
This was great news. But it seemed maybe it was a little bit less than MVP and was rushed out due to the false starts. I was determinted to give it a try.
The documentation is was a bit lacking, but seems to have had a few updates, which is awesome to know that AWS is taking feedback and correcting things really quick. But I really didn’t expect anything less.
AWS Client VPN
As per the description at the top of the What-Is documentation page, the AWS Client VPN is based on OpenVPN. It isn’t yet as configurable or as Highly-available as I’d like and the price point is probably a little too high for some smaller clients where this would benefit.
There are two ways you can use the client for authentication purposes. 1 is just with mutual-authentication (client certificate, this is the very traditional OpenVPN way) and with Username/Password using several of the AWS Directory services (e.g. Simple AD).
I’m going to go through setting up Username/Password Authentication in us-east-1 using the default VPC.
Username/Password Authentication
Simple AD
First let’s setup a test small Simple AD.
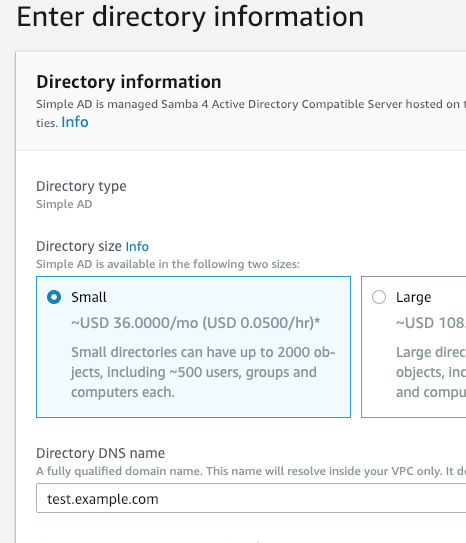
Set a domain name (I used test.example.com), and the Administrator password. Don’t worry about the NETBIOS name.
On the next page choose the VPC you want to connect it to (I just used the default VPC), review the AD configuration and click create.
Creating and uploading the OpenVPN Server Certificate
The instructions are pretty clear and just follow them. I’ve listed them all here in one go, so that you can copy and paste and it will just work for you.
cd /tmp
git clone https://github.com/OpenVPN/easy-rsa.git
cd easy-rsa/easyrsa3
./easyrsa init-pki
./easyrsa build-ca nopass
./easyrsa build-server-full server nopass
./easyrsa build-client-full client1.domain.tld nopass
mkdir -p /tmp/foo
cp pki/ca.crt /tmp/foo/
cp pki/issued/server.crt /tmp/foo/
cp pki/private/server.key /tmp/foo/
cp pki/issued/client1.domain.tld.crt /tmp/foo
cp pki/private/client1.domain.tld.key /tmp/foo/
cd /tmp/foo/
aws acm import-certificate --certificate file://server.crt --private-key file://server.key --certificate-chain file://ca.crt --region us-east-1
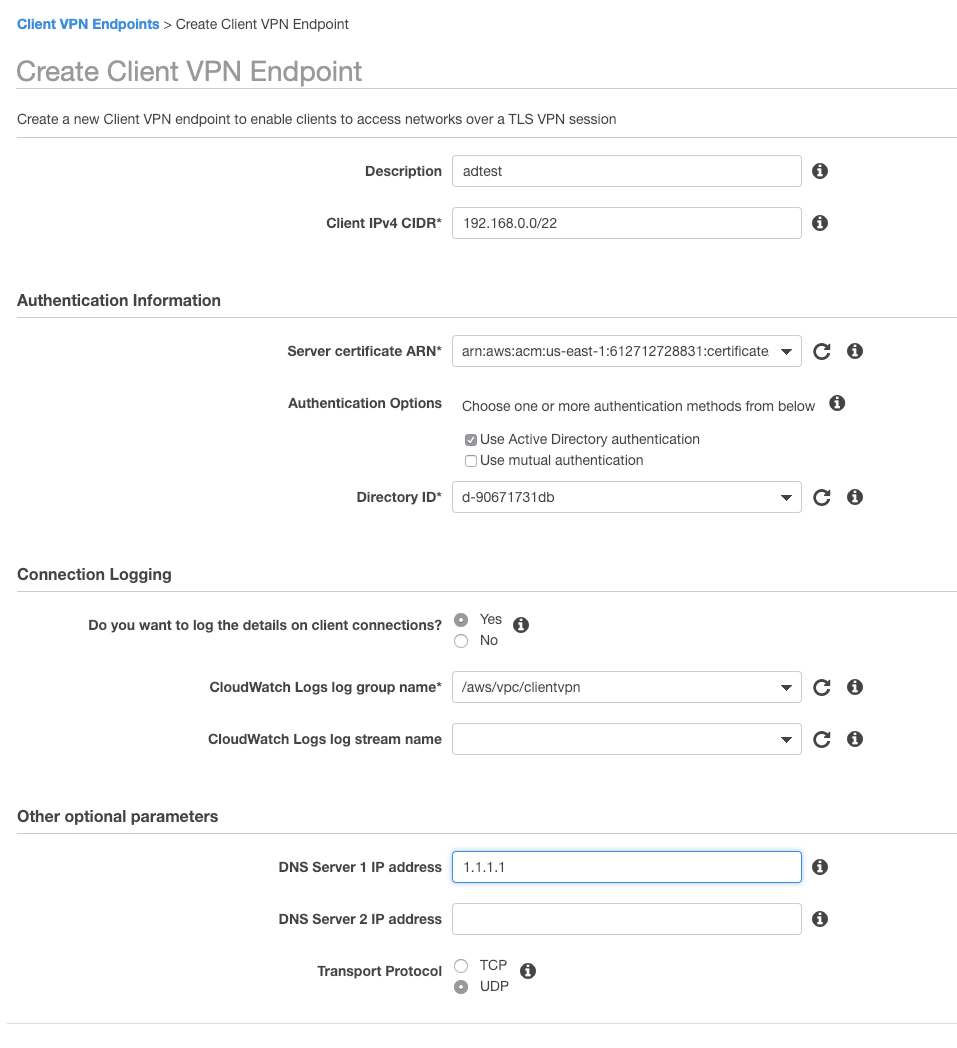
At this stage note down the ARN for the certificate that was uploaded. In the AWS Console this has the lovely name of “server”, based on the name we used during creation. If you want to change this, you’ll need to change out server in the appropriate places above.
Create the AWS Client VPN Endpoint
To setup the AWS Client VPN Endpoint, you need to navigate into VPC and select Client VPN Endpoints section.
There you are presented with a form to fill out. There are somethings to note here.
When selecting the Client CIDR, do not use an overlapping CIDR with your VPC, and it must be at least a /22 but not bigger than a /16.
Make sure you use the correct ARN from the previous step for the certificate and choose the directory from above. Both of these sections are using the ARN and Directory ID and not resolving them to friendly names as many other services do, so be careful when selecting.
It’s a good idea to send logs to Cloudwatch Logs. In this example I have created a Cloudwatch Logs group called /aws/vpc/clientvpn and then entered it here. (I don’t know if the Client VPN service role can create the Group, so I created it first.) You can leave the stream name field empty.
Lastly the DNS servers seem to be allowing any field, so you don’t need to use a DNS server in your VPC. This is just what is handed back to the client when it connects. For now stick to the default protocol of UDP. TCP can get a bit sluggish and unless you have specific requirements, UDP will suit most use cases.
Click create.
Associating the Client VPN with a VPC
Now that we have a Client VPN Endpoint we need to associate it with a VPC.
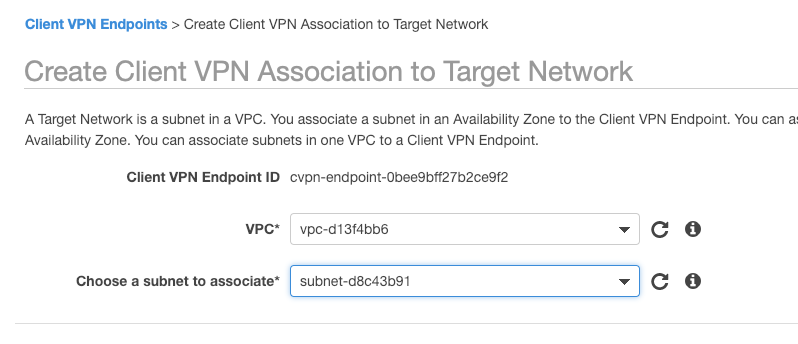
Here I’m choosing my defualt VPC, the same VPC I chose during Simple AD creation. I’m then choosing any Subnet for this example.
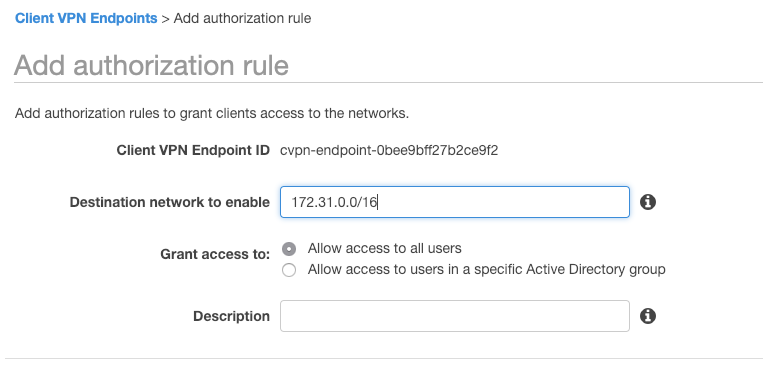
We now need to allow users access to this VPC so we have to create an authorization rule also.
I’m going to allow all users access to the whole VPC.
Client side setup
Now that we have finished setting up the server side, we need to download the OpenVPN configuration and use it.
There are a number of clients out in the wild, OpenVPN, Tunnelblick, Viscosity, Pritunl to name a few. Some of these are GUIs and they all act a little bit different sadly.
Download the configuration from the Client VPN overview screen in the AWS console.
Copy the configuration into /tmp/foo.
Edit it with your favourite editor and add the following lines to the bottom:
cert ./client1.domain.tld.crt
key ./client1.domain.tld.key
Now you can use this as is with OpenVPN e.g.
openvpn --config downloaded-client-config.ovpn
and you will be prompted for your Username/Password.
Or you can import it into your favour GUI.
One thing to note during my testing was some of the GUIs wanted to ping the endpoint, but AWS provided configuration has remote-random-hostname configuration option in it and the provided hostname doesn’t actually resolve.
This means you need to prefix the hostname to have it resolve. e.g.
Instead of:
cvpn-endpoint-0bee9bff27b2ce9f2.prod.clientvpn.us-east-1.amazonaws.com
You might amend the configuration to use:
1.cvpn-endpoint-0bee9bff27b2ce9f2.prod.clientvpn.us-east-1.amazonaws.com
Good luck and happy VPNing.